|
BALL
JOINT
(ALL MODELS EXCEPT HOCKEY)
The BOLA delivery head is mounted on a large ball joint,
which allows almost infinite adjustment of line, length and angle
of delivery.
Slacken the large knob at the front of the machine to loosen the
ball joint clamp. This allows you to select the desired position
for the delivery head before retightening the clamp.
When using the machine you may find it useful to leave the ball
joint loosely clamped to allow some movement for fine line and length
adjustment.
VERNIER
LENGTH
ADJUSTMENTS
For fine line adjustment, turn the small black knob clockwise to
move the line of delivery to the left, and anti-clockwise to move
it to the right.
Please note: When the machine is set up for spin, the Vernier controls
will have different effects on line and height.
DELIVERY
VARIATION
You will notice that even with the ball joint firmly tightened there
is still some movement of the delivery head. This allows the operator
to simulate a match situation and vary the line and length of individual
deliveries.
To do this, use the handlebar to temporarily move the head and alter
line and length as required. When the handlebar is released, the
handlebar will return to its original position (as long as the ball
is firmly clamped).
VERY
IMPORTANT
It should be remembered that a cricket bowling machine is potentially
very dangerous if it is not operated responsibly. Under no circumstances
should children without the supervision of qualified adults use
the machine.
All batsmen, machine operators and attendants must wear protective
clothing (helmets with face guards, pads etc.) and be constantly
aware of BOLA and the batsman.
After any adjustment of line, length or speed, feed a ball through
the machine with no batsmen to ensure that the adjustments have
been made correctly.
|
|
BOLA
28 BALL
AUTOMATIC FEEDER
An automatic ball feeder to fit all BOLA machines. Fitted in less
than two minutes it feeds a ball into the machine every 7 or 11
seconds (as selected). Optional remote control on/off switch allows
interruption of the sequence when required. Warning lights indicate
the release of ball.
|
|
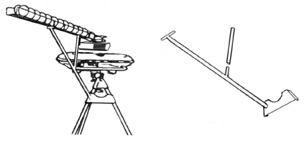
ASSEMBLY
Remove the automatic feed from its packaging. You should have two
parts:
1 Ball Rack and 1 ‘Y’ frame which attaches the feeder
to the machine.
To fit the feeder to the machine the ‘Y’ support frame
is slotted onto one of the legs so that it is on the same side of
the machine as the control panel.
Switch on the bowling machine and adjust it for the desired line,
length and speed.
Place the ball rack on the support frame so that it sits in the
open ‘U’ at the outermost end of the ‘Y’ and
the adjustable tube socket fits over the spigot part of the ‘Y’.
Slackening the black plastic knob will allow the feeder to be positioned
so that it drops balls cleanly into the machine. Tighten the black
knob when the required adjustments have been made. It may be necessary
to re-adjust this if the line or length of eth machine is adjusted.
Plug the 3-pin DIN plug into the socket on the left hand end of
the control panel.
BALL
FEEDER OPERATION
With the feeder switch in the ‘Off’ position, plug the
feeder into the socket on the left hand end of the bowling machine
control panel. The switch has five positions, which have the following
functions.
|